Showing posts with label practical sewing. Show all posts

7.13.2013

A Successful Scrap Quilt


I've been wanting to make a quilt for our bed for a long time. I considered making a cool tree quilt like this one, or this beauty from purl bee. The colors in this triangle quilt have me swooning. Okay, check out my quilt board already. 


But ultimately, I decided to go with the less expensive, less time consuming scrap quilt. Let's face it, I have a hard time finishing big projects like this, so I thought I'd make it easy on myself and just do squares. I did end up piecing a few squares, so that I could include some fabric scraps - but mostly its just 8" squares. 

As I was assembling it, I questioned my scrappy choice because it just wasn't as pretty as some of those others. I could have at least limited my color palette... But then John and the girls came in and started pointing out the fabrics they recognized and telling me which ones they liked best. That's what this kind of quilt is all about, right? Lots of memories. 


Puppy likes it. And about two minutes later, everyone else was snuggled in, too. So, yeah, that seems like a success. What do you think makes a good quilt?


2.11.2013

A Bag for Ruthie


My sewing is sporadic these days, so its nice to put something together, and see it turn out well. My sister's dog Ruthie spends a couple of days each week at doggie day-care, and she was in need of a new travel bag. This bag is kind of like most of the other bags I make: square, box corners, pockets on the inside - except much bigger. Much, much bigger.

I also made her some dog toys from the left over fabric scraps. That's right, coordinating bag and toys. She's a lucky dog.

4.13.2012

Spring Dresses


I saw this crazy simple lovely shirred skirt tutorial a month or so ago, and while I still haven't made one for myself, I thought that it would work so well with the pajama pattern I had just made for the girls.  But instead, I decided to lengthen the top and make it a dress, making it flare out a bit at the bottom.  I did about 10 rows of shirring. Again it was super simple, and it looked so lovely with a little sweater.


I think Lou's dress turned out looking more pajama like, but I think it's because the fabric is a bit thin.  Anyway, it would make a great night gown, too, right?


And then I made bloomers, cause let me tell you teaching a 4 year old to keep her skirt down is rough (let's not even mention the 2 year old).  Again I used the same pajama pants pattern, but made them really short. I used some stretch lace around the legs to make them snug around the legs and add a little frill.  Unfortunately, you can't see the lace at all here, because by the time I took this photo they'd been running around through the grass like crazy, and I feel like a bad mom when I make my kids stand still for pictures too long (not to mention pictures of their bloomers).  But anyway, you get the idea.


I realized as I took these photos that this will be our last summer here at this house, which is oh so bittersweet.  Such lovely memories here.


4.09.2012

Spring Pajamas!


I have to preface this post with the disclaimer that I don't usually make clothing patterns - and the main reason is that I really don't know how to convert something from one size to another.  Still I like to sew clothes when I can, and I can't help but love the simplicity of this style of shirt.  So anyway, don't think of this as a pattern so much as a how-I-did-it-maybe-you-can-too.

These pjs were made during a few stolen hours one  Saturday, when I was supposed to be sewing for the book.  I saw this very pink flowery fabric and it suddenly dawned on me - this would be perfect for light spring pajamas! - because, I don't know why, but they love to be extra girly at pajama time. 

I realized (while taking the picture of my unwilling models) that these clothes are a whole lot like the doll clothes patterns I've posted before.  And because that's true, I haven't bothered to draft the pants here.  If you need help, check out my doll clothes pattern, or have a look at Soulemama or Rookiemoms. I always trace a pair of pants I already have.

The shirt is basically a raglan shirt with a really wide neck. You add elastic to make it a normal size with a ruffly kind of look.

The size I drafted below is what I'm calling a 3T. I enlarged it for the older kid, and it seemed a little too big, so then I had to take it up.  So it seems like if you're enlarging you need to add less width than height?  Does that sound right?  Anybody know?

Well, anyway.  The dimensions I used are below, with instructions for the shirt in the photo.  It's super easy (just the way I like it), I made both sets of pjs in only a couple of hours.

And coming soon,  I turned this same pattern into a spring dress set...


9.20.2010

Firewood Tote Tutorial on Whip Up


I'm guest blogging on Whip Up today - well, okay, that was yesterday actually. Go check out my little manly tutorial and read about why John and I are building a cordwood home.  And while you're there, see all the other neat guest posts going on while Kathreen is on vacation.

Update: Whip Up is going to be so so missed, as Kathreen is. My firewood tote is now available here. 

1.23.2010

Sketch-wallet Pattern

Sketchbook Wallet

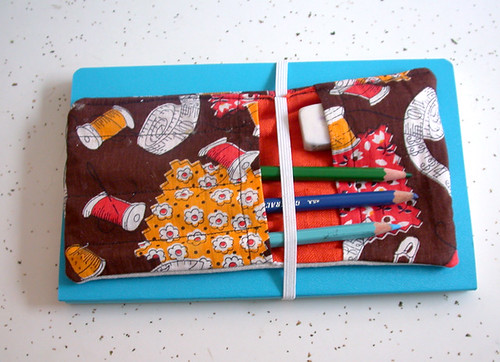
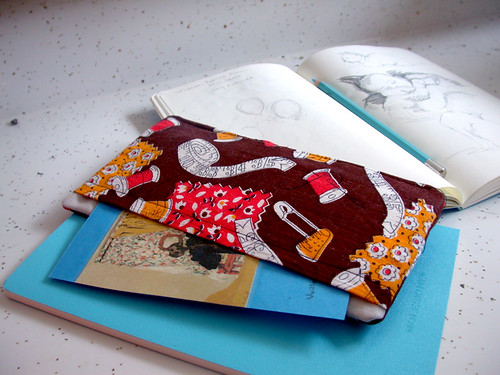
I mentioned this sketchbook wallet last August (has it been that long?) and thought it would be a good-organizy-New-Year's pattern. So here I've put together a quick tutorial for this little sketch wallet. It's a simple little pattern I fit all on one page - isn't that tidy? Click the pattern image at the bottom of the post to download it.

I got these swell moleskine books to start the year fresh. They are a standard size (5.25 x 8.25 in.) and my wallet is intended to fit with this size. Although, it could be easily adapted for a different size.

Sketchbook Wallet

Sketchbook Wallet

Really, I only use this when I leave the house. At home I like to keep my book free of constraints. I've made a bunch of these organizers, and each version gets simpler. I don't want my book to be too laden with supplies - it makes it feel to complicated, you know? I think a sketch book should be easy and inviting. So hopefully, this wallet will keep you supplied without weighing you down.


Sketchbook Wallet Pattern

10.31.2009

Fat Quarter Hand Bag Pattern


Remember my recent spoonflower purchases? I put together another pattern especially meant for fat quarters. This time the bag has a small handle making it more of a little party hand bag. Usually, I'm hesitant to use great fabrics for my liners, but sometimes it feels just a little luxurious to have something fancy hidden inside, you know? I'm pretty sure I've bought pants before because of the lining in the waistband. So anyway, my pretty fabric by snork is inside.


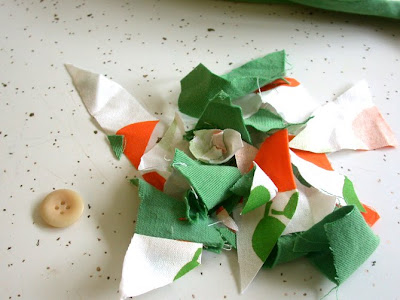
Oh, yeah - and the pattern has a little accompanying drawstring coin purse - to be sure to use up all the fabric. These are all the scraps I had left over.


After I made this I decided I needed a shiny version, so I made a little blue one, too. L claimed this one for herself, so I may have to make another.


This pattern is pretty easy and would be great for beginners. It requires 2 fat quarters, a button and hair elastic, interfacing, and your basic sewing tools. No tricky skills required. It's sort of a big file - I'm still trying to figure out how to shrink my file without losing quality. Remember, I would really love feedback, on the pattern, the pdf, my grammar, whatever.

Update: the pattern has been moved to the shop. Thanks!

and p.s. please feel free to sell bags made from this pattern.

3.25.2009

Spring Cleaning Dust Mitt Tutorial


I went to a great local rummage sale recently where you can get a bag of clothes for a dollar. I was a little gluttonous and grabbed everything that I thought I could cut up and use for something else - although I didn't have anything in mind at the time.

Later when examining some of my finds, the materials dictated the project - and I ended up using three different garments together for this project. I used a sweatshirt, a terry cloth shirt (who wears terry cloth shirts?), and the cuffs from a shrunken sweater. You could do this same project with just a sweatshirt and a hand towel if you wanted. Or if you have a swiffer, try this similar tutorial.


Typical of my sewing style, this tutorial has few actual measurements - just deal with it.

First I cut the terry cloth shirt into a rectangle that was a bit wider than my hand and twice it's length. Then I cut four - four inch strips the same length as my rectangle from my sweatshirt. Next cut slits along both long sides of each rectangle, towards the middle, but not quite touching so that your rectangles are shaped sort of like a pipe cleaner. You can see mine aren't very straight.


Lay one strip fuzzy side up, towards the left side of your terry cloth rectangle, and sew down the middle. Lay the next strip so that it overlaps the first and repeat, making sure you don't sew down any of the fringe from the first rectangle. Repeat this with the next two strips so that you have spaced the four strips somewhat evenly across the width of your rectangle. It should look like this:


Now fold the fringe on each long side in like this:


Now you will fold the terry cloth rectangle in half with your fringe inside, and sew up the side seams. Folding the outer fringe in will insure that none of it is caught in the seams.


Once you have sewn your side seams, with the mitt still right side in, place the cuff from your sweater (or take one from your sweatshirt) and put it inside the mitt. With a zig zag stitch, sew the edge of the cuff to the edge of the mitt. My cuff seemed a lot smaller than the circumference of the mitt, but I stretched it as I sewed and it ended up fitting fine. If you're worried about this, you could pin it first. It should look like this once you have sewn it on (sorry for the fuzzy picture).


Turn the mitt right side out and trim any stray threads. Ta da!


Now get dusting!

Made one? Add it to the wewilsons pattern pool.

2.18.2009

Reusable Snack Bag Tutorial


I'm trying to clear out a cabinet to make room for the new little one's clothes - and that means finally getting rid of some excess fabric.  I decided to make these simple little snack bags, which make a nice alternative to disposable bags.  (Updated 7/24/2011:   This pattern is for a lined bag. If you want a bag with no lining, just hem the short edges, then follow the instructions from step 4 on.)

I thought it would be super easy, just like a zipper pouch or something. But it took me an afternoon of reassembling the pieces to figure out an easy way to put them together than didn't require any complicated turning or handstitching. I finally figured out what I thought must be the simplest method of putting them together, and put together a little tutorial for you. It really is easy, it's just easier when someone else maps it out for you! Instructions are below.

Materials
scrap sizes of fabric
equal size piece liner fabric

hook and loop tape
scissors, thread, pins
sewing machine


Instructions


These instructions are for a lined snack bag. If you want to make a bag without a liner, just hem the short edges, then follow the instructions from step 4 on.
Instructions
1. Cut your two different fabric scraps into two equally sized rectangles. You may use a ziplock bag as a reference, or just whatever size your scrap will allow. Make sure the rectangle is twice as long as the bag because you will be folding it in half.
2. Right sides facing, sew a short end of the rectangles together. Repeat this with the opposite end.
3. Now turn the rectangles right side out. Iron the seams flat.
4. Cut a length of hook and loop tape about 1/2” shorter than the seam. Then, position the hook tape centered just below the seam on the inside of your bag and topstitch in place around the edges of your tape. Repeat this with the loop tape on the opposite end.

5. Fold the rectangle in half, with the inside (the side with the hook and loop tape) out. Line up your top seams and pin in place.
6. Stitch down both sides of the rectangle with a 1/4” seam allowance, and neatly trim any threads or rough edges.
7. Turn the bag right side out, closing the hook and loop tape. If you don’t care about raw edges, you could stop here. Or take it one step farther and top stitch down both sides, encasing the raw edges inside this new seam.
 

Ta da! Easy peasy!
 

Feel free to sell items made from this pattern, but please share a link back to me!


Made some? I'd love to see! Add it to the wewilsons pattern pool.

2.06.2009

Bear Bag Tutorial (with variations)


My Aunt Terre made me and my sisters little bags like this for Christmas one year. I use one of them for L a lot, but decided to draft the pattern with some variations. It's pretty simple, but also really versatile and could be dressed up in a million ways - it would make a sweet valentine for your little one!

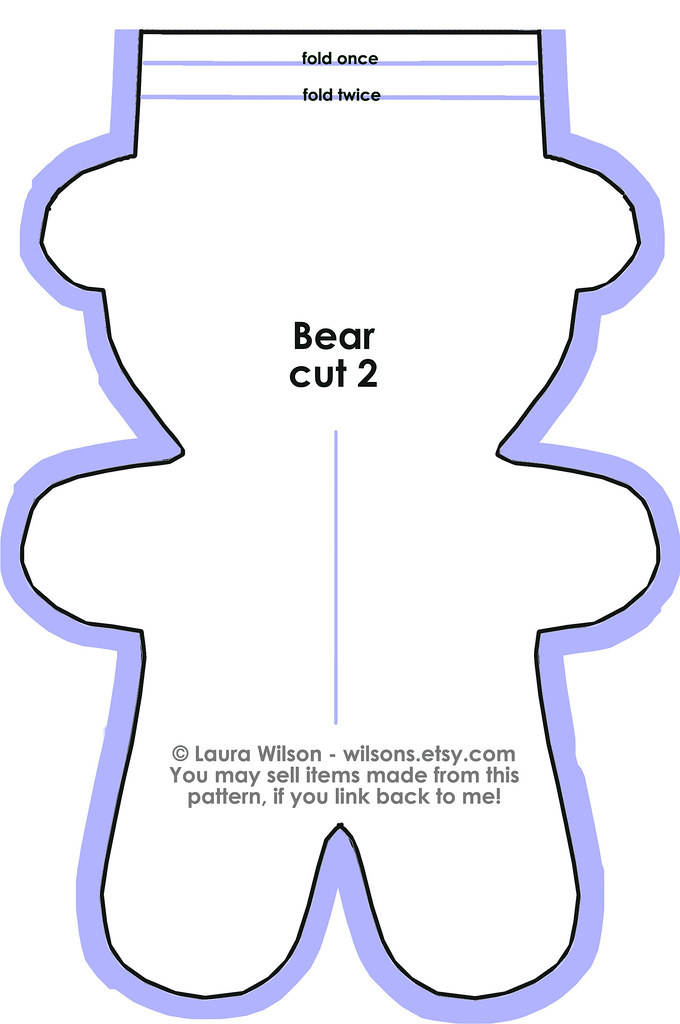
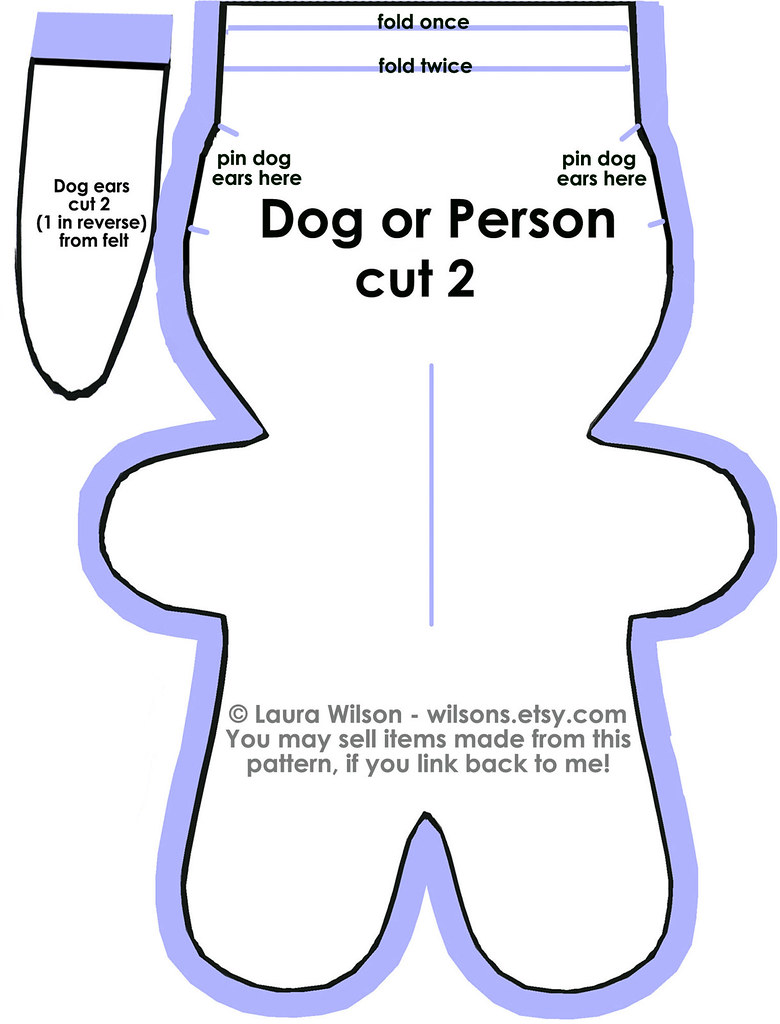
The complete instructions are included in this post, or you can download the pdf with more pictures HERE. Be sure to also copy the images of the pattern at the bottom of the post.

Made some? I'd love to see! Add it to the wewilsons pattern pool.


This picture shows several sizes and all four variations. The small man is from a regular 8x10 sheet of paper and would make a nice toy bag for your little one to carry. The bear and dog are not quite double the first and will hold lots of little toys for car trips, church, or other outings. The cat is almost 300% of the original and would make a sweet pajama bag for sleepovers!

Bear Bag Tutorial (with Cat, Dog,and Person Variations)
Materials:
Pattern, Fabric to fit size of pattern (fat quarter to as big as you want), scissors, pins, sewing machine, yarn or other form of cord, buttons, felt, embroidery floss
Tips on Printing the Pattern:
This pattern will fit neatly on regular typing paper. If you print it out to this size, it will make the smallest size bag in my pictures. If you want to enlarge it, you have a few options. You could print it out on multiple sheets of paper, then trim off the margins and tape it all back together. Or you could take it to some place with a copy machine and enlarge it to whatever size you’d like. OR you could do it the old school way by printing it on one page, then using graph paper enlarge it by hand.
Instructions:
1. Print and cut pattern. Printed on an 8x10 it will make the smallest size pictured. Enlarge for a large toy bag or a pajama bag.
2. Pin pattern to your fabric and cut 2 pieces. If using Dog variation, also pin and cut ears from felt.
3. Right sides facing, sew together the body pieces leaving open on top flat edge. If using Dog variation, pin ears in place sandwiched between the two layers. Backstitch on corners and angles to reinforce. Make nice clean angles by pivoting the fabric around your needle.
4. Clip slits in seam allowance along all curved edges and corners as close to the seam as possible without cutting through seam. This is very important. Turn bag right side out to make sure it lays neatly. If not, turn back inside out and clip a little more. When it lays nicely, press the bag to help keep its shape.
5. With bag inside out, fold the opening wrong sides together about 1/4 - 1/2” (depending on size of bag you’re making) to begin the drawstring casing. Sew flat all the way around opening.
6. Fold top edge a second time, about 1/2” so that it uses all of the remaining space allowed for the opening. Sew flat almost all the way around, leaving a 1” gap to insert cord.
7. Take three lengths of yarn about 5 times lenghth of your opening. Tie the three yarns together with a knot on one end and braid the length of the yarn. Tie a knot at the end. If you are making the smallest size bag, use a finer yarn or allow extra room for your casing. If you have another material like cording, shoe laces, twine, or other small rope, that will work fine and you don’t have to make your own.
8. Attach a safety pin to the yarn (or your cord) and push through the casing around the opening of the bag. Once pulled through, with the opening fully opening, tie the two ends of the cord together, leaving long tails to pull.
9. Now you’ve completed the bag! Dress it up by adding some face details. Use buttons for eyes, scraps of felt for noses, and embroidery floss for cat whiskers. Be creative! I gave mine a tie. :)


Here are the patterns for each animal. They fit and 8x10 sheet of paper, but can be enlarged, too.


bearpatterndogpatterncatpattern

1.26.2009

Fat Quarter Purse Tutorial


My first Spoonflower fat quarter arrived today! I was really pleased that my first fabric turned out really lovely. I didn't have any problems with color, and the quality of the fabric is very nice.

They recommend you order swatches before you buy a lot of fabric, but I hated to have to wait all that time to see my fabric, and then only have a swatch - so I went with a fat quarter. In the meantime, I tried to figure out what to do with my first self-designed fabric, and I came up with a purse pattern that uses precisely one fat quarter. It's a sling purse, with zipper, lining, and an adjustable strap.


So, I made my pattern into a little pdf tutorial (another first for me!) for any of you wondering what to do with your fat quarters. The tutorial is now available for a small fee in my etsy shop.

Update - the pattern has been reformatted to a four page pdf, so it prints nicely on regular paper.

Made one? I'd love to see: Add it to the wewilsons pattern pool.

7.28.2008

Knit a Market Bag


The market bag I made on my trip turned out so well, I decided to share the pattern (below). I started with the pattern from purl bee, but I wanted something with a heftier handle, and a little more shape. As usual, I just sort of made it up as I went, but unusually - it turned out well!

When I first finished it, I was afraid I'd made it too small, and gathered too much so that the opening was too small. I had yet to realize how much this little bag would stretch. It turns out it's perfect.

Here it is , stuffed full of groceries on my kitchen counter.

I unsuccessfully tried to hold it up and take a picture. It was pretty heavy. It will hold a lot more than a plastic grocery bag. This picture shows the bag with all the stuff that was in it: 4 can goods, a bottle of olive oil, a bottle of sesame oil, a lemonade canister, a bag of beans, jar of peanut butter, coffee can, cornbread mix, and a small canister of sea salt.

Here's a close up of those handles I'm so proud of. I think the gather looks really cool. You can also see the little antique pin of a cuckoo clock I got on our vacation. Lovely.


If you like a little flexibility in your knitting, then this is a good pattern for you. I was so excited to see how it turned out, I could hardly put it down. this is the first knitting pattern I've ever written out to share, so let me know if anything doesn't make sense.
Market Bag Pattern

what I used:
5 oz (145 g) of 100% cotton yarn, 4 ply
size 10 knitting needles
size 10 (J) crochet hook
size 6 circular needles (I used these for the straight part and the circular part)

1.)The Bag

knit a lace rectangle that is 8" x 24". This is where the variation comes in - you could do this with a variety of lace patterns and needles. This is what I did:

using size 10 needles, cast on 35 sts (this lace pattern requires an odd number of stitches, if you use a different size needle, use however many stitches makes 8", but make sure it's an odd number). This will be the top front of the bag.

pattern from purl bee:
Row 1 and 3: purl
Row 2: k1, *yo, k2 tog, repeat from * to end of row
Row 4: *ssk, yo, repeat from * to end of row, k1

follow this pattern until your pieces measures about 24", bind off.

2.) The seams

fold your rectangle in half so that it measures 8" by 12".
beginning about 1.5" down the side, sew the side seam closed (leaving the top 1.5" open) with a crochet hook:

start with 1 loop on hook, go through top seam stitch on front of bag and the top seam stitch on back of bag, pull yarn though (now you have 2 loops on your hook), pull yarn through these two loops so you have 1 loop on your hook. Go down the side seam, repeating this until you have closed the side of the bag. leave a tail a couple of inches long, and weave in. Repeat for the other side seam.

3.) The gather

using size 6 needles, pick up 18 sts on the top front. (You are now "gathering" by only picking up every other stitch, so your number of stitches here will be half as many as you originally cast on. You will need an even number of stitches for the pattern.)

Work in seed stitch (*k1, p1, repeat from * to end of row) for 8 rows. bind off.

Repeat this on the top back of the bag.

4.) The handles

Using size 6 circular needles, starting at the far right side of the top front of the bag, pick up stitches in the open part of the seam (which now includes the 8 rows of seed stitch on both sides). You will pick up sts first going down the open part of the front side seam and then coming up the back side seam. I picked up about 1 st per row, but I picked up two stitches per row where the seams met. You should have something like 32 stitches on your needles.

Now cast on 36 stitches (or twice as many as you picked up in step 3, If you want longer handles, increase this number to 72).

Now pick up approximately 32 sts in the open part of the opposite seam in the same manner as the first.

Cast on 36 stitches (or twice as many as you picked up in step 3, If you want longer handles, increase this number to 72).

Join. (It's okay if your number of stitches varies, especially if you've used a different size needle. Just make sure you have an even number of stitches on your needle for the pattern) Work in seed stitch for 8 rows. bind off. Weave in any ends still sticking out - and you're done.

Made one? Add it to the wewilsons pattern pool.