Showing posts with label dress up clothes. Show all posts

1.29.2011

Dress-Up Crown Tutorial


I made birthday crowns for my girls last year.  I had intended for them to be a special birthday thing, that we got out only once a year, so they would be extra special.  But, as these things go, the girls loved them, and they found a permanent home in our dress up basket.  I had no idea how much the kids would love them.  They are a regular feature around here.


I decided to make a bunch for an art fair coming up, and put together this tutorial while I was at it.  I have to add, there are a million great tutorials out there for crowns.  My version, as usual, just keeps it simple (I've left the elastic exposed), made use of what I keep on hand (sorry, not felt), and allows for fun use of trimmings.  And the trimmings are the best part, right?  I love dumping out my fabric and ribbons and sifting through to find just the right match for that funky ribbon, or finding a surprisingly lovely combination of fabrics.  Ah, that's what sewing is all about. 

I digress.  The directions are below, but you can also download the templates I used.  I tried to make a couple that were boyish, too - they're angular and not pink. My crowns have about a 17" circumference that will stretch quite a bit, so they're one size fits most - just use a bit more elastic if you have a big head. :)

Update:  Be sure to check out the Nicholas Crown Project that this tutorial inspired!  I'm giving away dress-up crowns!  Come help me out!

Instructions:
1.  Draw or print template, cut out.  If you draw your own, the width should be about 9 inches.
2. Pin pattern to fabric and cut out fabric adding a 1/4" seam allowance all the way around. Cut 2 (I like to used different fabrics for the front and back).
3.  Cut out interfacing and iron to the wrong side of your back fabric.  Alternately, you can just cut a third layer of heavy weight fabric and put it in the middle of your sandwich - both work well.
4.  Topstitch trimmings onto your front fabric.  I used ribbon, bias tape, buttons, lace, and a handmade crocheted rose.  The possibilities are endless.
5.  Cut a 9" piece of 1/4"-1/2" elastic.
6.  With right sides facing, sew around the edge of your crown.  Leave openings on the bottom inch of both sides.  You'll turn right side out through one of these holes, and later insert the elastic in each side.
7. Clip slits in seam allowance, especially in the corners.  Turn right side out, poking out all the little points and curves with a chopstick/pencil thing.  Iron sound that all the points are neat, and the openings have their edges neatly tucked in.  Don't skip the ironing - it really helps.
8.  Starting just after the opening on one side, top stitch around the crown.  When you reach the opening on the opposite side, insert on end of the elastic (about 1/2"-1" from the base of the crown) and back stitch over it a few times.  Continue topstitching around the crown, and repeat the elastic insertion with the other end.  Be sure not to twist the elastic.
 Feel free to sell items made from this pattern; however, if you do, please give credit to me as the designer. 


9.29.2010

Tree Costume Tutorial


You can download the one page tutorial here, which is almost unnecessary. I probably should have just typed it into the blog post, but I think I'm addicted to Adobe Illustrator now.  This tree body was super easy.  I sat down and sewed both in about thirty minutes.  The leaves were a bit more time consuming.  I cut them out and sewed them on the hat by hand (the sleeves by machine) while watching a movie after the girls went to bed.  It took awhile, but it wasn't hard.  You could probably do it all on machine much faster if you were motivated. 


I made both costumes from a fleece throw blanket and a pair of green sweatpants from Goodwill, under $5, you can't be that.  These fabrics are great since they don't unravel, so I didn't finish any edges.  Which I think is the way it should be for a Halloween costume.

Oh yes, I also used some scrap green knit for L's hat and a head band for J.  I couldn't keep the head band on her, so maybe a hat that I can tie on is still in the works.  We'll see.  At the last minute I decided to add a little pocket to each tree trunk so we could put little woodland creatures in the trees.  L is sporting a squirrel. 

L is a very happy tree, J is running off to join her fellow saplings in the woods.

9.16.2010

Dressing Up

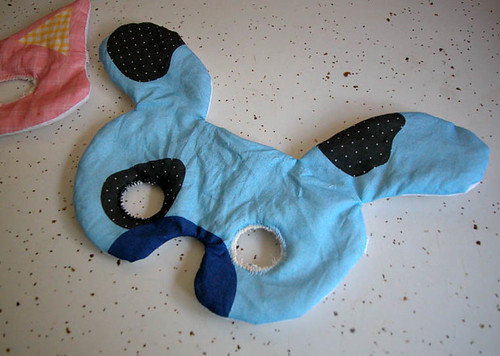
Dog Mask


We're all costumes around here.  Last time I rearranged the living room (it's a small house, so I'm always rearranging to meet our changing needs), I put a basket of dress up things in the kids corner.  There are tutus, aprons, bandannas, hats, cat ears, and crocheted pinafores.  Having them accessible has made us dig in and put them on almost daily.  Today, I'm adding a few new things.

Cat and Dog Masks


First, Spoonflower is having another themed fabric contest for Halloween masks (go vote for me!).  I couldn't resist, so I joined the fun.  My fat quarter has four masks: bunny, cat, dog and owl.  L has been begging me to make the cat and dog, so I finally did today.  They were pretty easy to whip together.  I put an elastic around the head, but the girls felt a little trapped like that - so I think for the next two, I'm going to leave out the elastic and just sew on some strings so it can be tied on or just held in place.

And Second, I had a good idea for a Halloween costume, and L is pretty excited about it, so we made a trip to Goodwill and got started.  Yes, my little girls are going to be trees.  It's taking everything I have to wait until I finish the costume to tell you all about it, but there will be a full tutorial when I'm done.  Which is good, because I need a good excuse for making their costumes a month early.  This is L holding her branches up sans leaves.

L may be a little confused by all the costumes.  She told me she's going to be a tree for Halloween and she's going to wear cat ears and say meow.

9.03.2010

Cat Ears Tutorial


 I'm planning a mother daughter night soon.  L and I will be going to see the middle school play The Aristocats.  I'm too excited.  I want it to be an over the top girls night, three year old style.  I made these cat ears for L and I to wear to the play, and perhaps to the gelato place afterwards.  J isn't quite ready to sit through a play, but she'll get to wear the ears, too.  Any recommendations for making the night more fun?


I sort of figured out the ears as I went, and it turned out pretty easy.  I think the trick is that the ear fabric needs to be thick so that it will stand up.  I bought our headbands at the dollar store, and they have a fabric cover over them, which also might help hold the ears in place.  I meant to get some that were hair colored, but L liked these bright colored ones and they did seem comfier.  I think they turned out well.  I didn't sketch out a pattern, so you'll have to draw your own ear shape, which I'm sure you can handle.  I think bunny ears would be great, too.

Materials:
thick fabric, lightweight fabric
head band, matching embroidery floss

1.  Cut 4 ears from a thick fabric like fleece, flannel, or - like mine - an old baby sleeper.  
2.  cut 2 smaller ears for the inner ear.  Fold the raw edges toward the back and iron flat.  Top stitch or hand sew to on of the fleece ears. 
3.  With RSF, sew front and back fleece ears together.  Turn RSO and tuck bottom edges in.  
4.  Place one ear over headband where you'd like it.  Starting on one side from the back, stitch through the bottom edge of the ear, around the headband, and back in the bottom edge. Repeat along the entire bottom edge.  Repeat with second ear.

Hope that's clear enough!  Let me know if you need better pictures.

4.22.2009

Kangaroo Apron Tutorial


L has been kind of into kangaroos lately, and John brought home "Katy No-Pocket" for her after a recent library conference. She loves this book, and it gave me the idea for this little birthday gift. Also, I saw a neat tutorial recently for a child size apron made from a tea towel and ribbon - I can't find this now, but I made mine with that pattern in mind. Anyone know where that is?

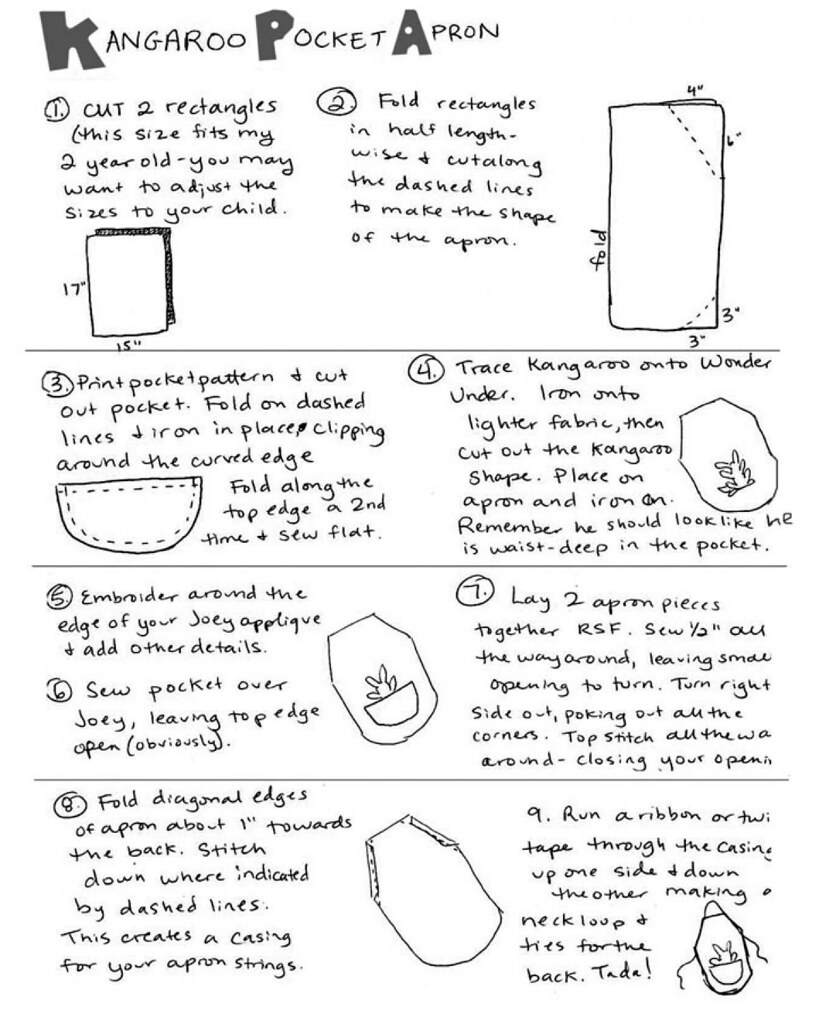
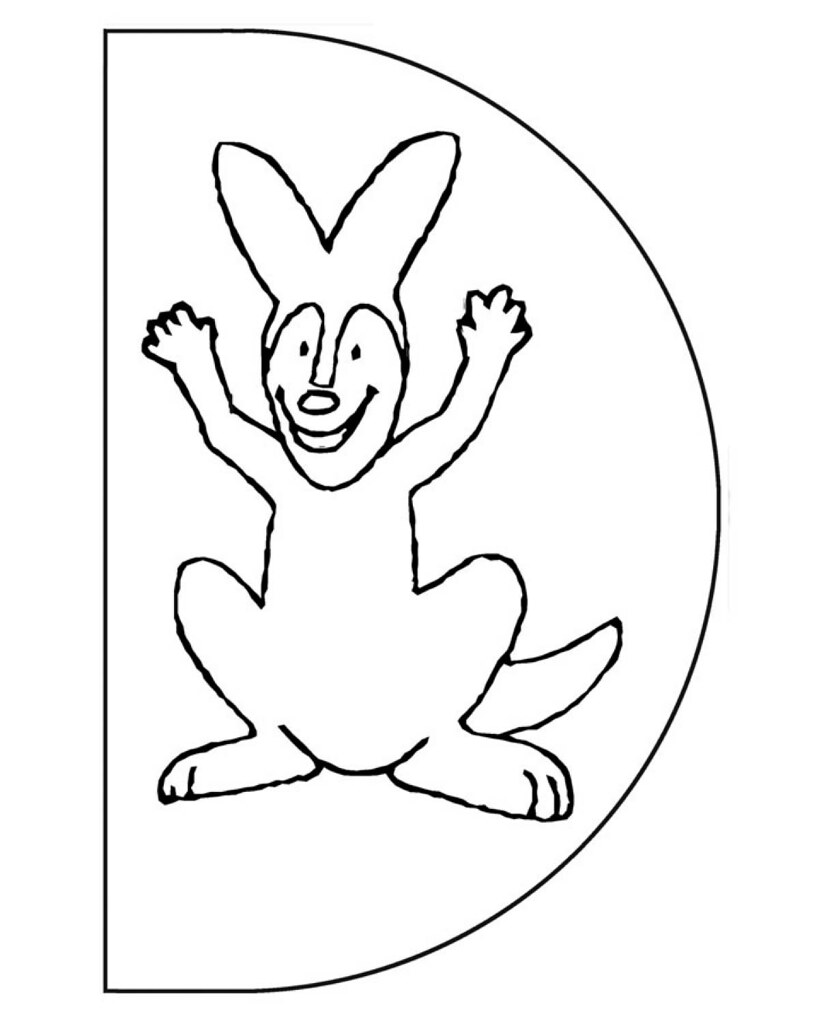
I drew up a little pattern for any of you who might have little kangaroo lovers at home, with instructions and a template for the Joey and pocket. Click on the images to enlarge.

Kangaroo apron tutorial

kangaroo apron pattern pieces

The pocket is big enough to tuck her small animals in, but with the little Joey applique they've always got a passenger. I used shiny blue fabric for the back for a little extra color pizazz.